If you're anything like me, holiday shopping often finds me buying something incredible for a friend and liking it so much that I buy it for myself, too! Never has that been more appropriate than now...right here on this blog...buy a cooking or gardening class for a friend at 25% off and do the same for yourself! In fact, do it for all of your friends! Don't know which class they'll like, a gift certificate will do very nicely! With a great schedule of classes for the gardener and the cook, there's something for everyone.
Happy Holidays!
Friday, December 23, 2011
Wednesday, December 14, 2011
Yesterday, I had the pleasure of attending a Bris - a wonderfully happy occasion when a baby boy is born into a Jewish family. Except for that brief moment of displeasure for the baby, it's an occasion to celebrate the next generation and the happiness that the new child will bring.
As we sat and enjoyed our meal - all Jewish occasions involve an elaborate meal - the topic of conversation turned to Mothers. Specifically the conversation went like this "If anything goes wrong, is done wrong or any parenting mistakes are made, just blame the Mother. It's always her fault." Not very comforting - for me, or the new Mother!
This morning I took a few minutes to enjoy my breakfast while looking out into the garden. I thought to myself that these plants are like more children for me. I take care of them. I feed them and keep them warm, protect them from harm and cheer for their growth and successes. Parenting plants is so much easier than children. They will never have to make any difficult decisions or choices in life. When a child makes a bad choice or decision, it is, of course, the Mother's fault. Not so with plants - no choices for them to make. And then I realized that I'm the one calling all the shots! Whatever happens, it's all my fault! And I thought raising plants was easier than children...
Saturday, November 19, 2011
Every year I hope and wish that the warm weather will hold into November so I can serve homegrown tomatoes on Thanksgiving. As the hours of sunlight diminish and night-time temperatures dip into the chilly range, the quality of tomatoes still on the plants becomes questionable. Rather than leaving the last Ananas Noire on the plant to possibly succumb to the cold I decided to harvest it. That was a few days ago when it was still green. Even if I wouldn't be able to pick the tomato on the holiday I thought that maybe, just maybe, it would ripen and be as perfect as a homegrown tomato can be on Thanksgiving. As luck would have it, it ripened quickly and it was delicious in tonight's green salad. I don't think it would have lasted another 5 days.
Tonight's tomato was a little on the small side but still beautiful and pretty darn tasty...pink in the center with emerald green borders and mild and sweet in flavor. I can't say the same about most of the other tomatoes I pick this time of year. Eating them uncooked can be less than satisfying, so I find myself roasting them in the oven and using them in sauces and soups. One of my favorite soups to make is a simple roasted tomato soup. I am not exaggerating when I say that I have made four batches of it in the past week and that's because my family keeps asking for more!

Tonight's tomato was a little on the small side but still beautiful and pretty darn tasty...pink in the center with emerald green borders and mild and sweet in flavor. I can't say the same about most of the other tomatoes I pick this time of year. Eating them uncooked can be less than satisfying, so I find myself roasting them in the oven and using them in sauces and soups. One of my favorite soups to make is a simple roasted tomato soup. I am not exaggerating when I say that I have made four batches of it in the past week and that's because my family keeps asking for more!

Roasted Tomato Soup
1 cup unseasoned breadcrumbs
½ cup plus 2 tablespoons olive oil
3 cloves garlic, finely chopped
2 large onions, one finely chopped and the other sliced thin
3 pounds garden fresh tomatoes, peeled and cored
1 quart chicken stock
¼ cup red wine vinegar
sea salt
additional olive oil and chopped dill for garnish
salt
pepper
Preheat oven to 425 degrees. Cut the tomatoes in half and place them on a roasting pan, cut sides up.
Lay the sliced onions on top of the tomatoes. Drizzle with olive oil and sprinkle with sea salt.
Place the pan in the oven and roast the tomatoes for 20 – 30 minutes until they begin to carmelize. Remove tomatoes from oven, set aside.
Place garlic and breadcrumbs in the bowl of a food processor. Add ½ cup olive oil and process until it becomes a thick paste.
In a heavy saucepan, heat remaining olive oil. Add chopped onions and cook over low-medium heat for 6 - 8 minutes until translucent. Add breadcrumb mixture and cook for 2 minutes longer. Add roasted tomatoes to pan, stir to combine, add chicken stock. Bring to a boil, reduce heat and simmer for 20 minutes. Remove from heat.
Allow soup to cool slightly and then process until smooth with an immersion blender or in the food processor. Stir in red wine vinegar. Season with salt and pepper to taste.
Reheat soup if necessary, then ladle into individual serving bowls. If desired, garnish with a swirl of extra virgin olive oil and sprinkle with chopped dill.
Important note: The color of your soup totally depends on the tomatoes that you use...it's equally delicious when it's deep red as it is when it's a pale melon color!
Important note: The color of your soup totally depends on the tomatoes that you use...it's equally delicious when it's deep red as it is when it's a pale melon color!
Saturday, November 12, 2011
With Thanksgiving just two weeks away I find myself focusing on food...inviting guests, preparing menus, stocking the pantry and perfecting recipes. Holiday entertaining can be daunting especially when there's also a home to decorate, gifts to buy, cards to send and daily meals to be made. I've created a schedule of classes and events for the season that will help you glide through the season with pleasure and joy. Cooking classes can help with the constant flow of hungry guests; stationery makes a wonderfully personal gift for the person who seems to have everything; a fresh holiday centerpiece is sure to delight you even at your weariest moments; gardening classes provide garden support in an outdoor setting that will clear your mind of the holiday hustle and bustle and, when you still have one more gift to buy, a Gift Certificate for an upcoming class will always do!
The list of classes and events has been updated through Spring 2012...
Let me be a part of your holiday plans!
The list of classes and events has been updated through Spring 2012...
Let me be a part of your holiday plans!
Monday, October 31, 2011
When I was growing up Halloween was a time that allowed my very creative Mother to really show her stuff. She always made our costumes which we proudly wore to trick or treat and to the school carnival every year. As I recall, the costumes were always fun and lively. Scary really didn't enter into our Halloween activities - except when we knocked on one particular family's door to trick or treat. The lady of the house, who was a good friend of my Mom's, was always a little scary. She had a strong personality and a very full head of wild white hair to go with it. On Halloween, she dressed as a witch, dimmed the lights and turned on scary music. To the children in the neighborhood, Mrs. R. truly was a witch. In actuality, she was very nice and her white hair was striking!
When my children were little one of the things I enjoyed most was making their costumes for Halloween. Like my Mom and her sister, my sisters would pitch in to help me get the sometimes very elaborate costumes made. Each year, the costumes reflected something special about my boys...a special interest or hobby. Even now that the boys are grown, I've saved all of the costumes. They're much more than just costumes, they're memories.
Each year, when the last neighbor's door had been knocked on and before counting candy and trading began, we would get into the car and drive to Grandma and Grandpa's house. My Mom would always act surprised to hear her doorbell ring. Even more of a surprise, though, was whatever costume she and my sister would have conjured up while waiting for us to arrive!

As my boys got older the very notion of Halloween changed. Swords and weapons, frightening masks and fake blood replaced my works of art and labors of love. But, the tradition of ending the evening by ringing Grandma's doorbell lived on. That's probably the part I miss the most.
I remember crowded streets lined with kids when I went trick or treating. My neighborhood now is very dark and a bit off the beaten track so we don't get many trick-or-treaters. Halloween is usually a very quiet evening up here. My kids are old enough that they enjoy handing out candy to the few trick-or-treaters that make their way up here.
The kids are grown and trick-or-treaters may be few, but we still enjoy the season. Lighted bones and skeletons adorn the walkway. Our sound activated ghost, Phantasma, hangs at the door to give a bit of a scare every time the door opens or closes. Various Halloween themed needlepoints are placed throughout the house and the ceramic Halloween village is assembled, lighted and the screams and scary sounds are at the highest volume. With a pot of chili on the stove, we carve pumpkins and anxiously run to the door every time the bell rings. Even if you don't come by for a handful of candy here's a Halloween treat for you to enjoy.
Happy Halloween!
When my children were little one of the things I enjoyed most was making their costumes for Halloween. Like my Mom and her sister, my sisters would pitch in to help me get the sometimes very elaborate costumes made. Each year, the costumes reflected something special about my boys...a special interest or hobby. Even now that the boys are grown, I've saved all of the costumes. They're much more than just costumes, they're memories.
Each year, when the last neighbor's door had been knocked on and before counting candy and trading began, we would get into the car and drive to Grandma and Grandpa's house. My Mom would always act surprised to hear her doorbell ring. Even more of a surprise, though, was whatever costume she and my sister would have conjured up while waiting for us to arrive!

As my boys got older the very notion of Halloween changed. Swords and weapons, frightening masks and fake blood replaced my works of art and labors of love. But, the tradition of ending the evening by ringing Grandma's doorbell lived on. That's probably the part I miss the most.
 |
| Not exactly a nature lover, one year Mom created a tree costume. She got a good laugh and it's one of my favorite memories of her fun loving spirit. I suspect if she were still here she would find a way to dress up as a tomato! |
I remember crowded streets lined with kids when I went trick or treating. My neighborhood now is very dark and a bit off the beaten track so we don't get many trick-or-treaters. Halloween is usually a very quiet evening up here. My kids are old enough that they enjoy handing out candy to the few trick-or-treaters that make their way up here.
The kids are grown and trick-or-treaters may be few, but we still enjoy the season. Lighted bones and skeletons adorn the walkway. Our sound activated ghost, Phantasma, hangs at the door to give a bit of a scare every time the door opens or closes. Various Halloween themed needlepoints are placed throughout the house and the ceramic Halloween village is assembled, lighted and the screams and scary sounds are at the highest volume. With a pot of chili on the stove, we carve pumpkins and anxiously run to the door every time the bell rings. Even if you don't come by for a handful of candy here's a Halloween treat for you to enjoy.
Happy Halloween!
Chicken Chili
2 tablespoons extra virgin olive oil
1 medium onion, chopped
2 large garlic cloves, minced
1 lb boneless, skinless chicken breasts – cut into strips or small chunks
4 teaspoons chili powder
1 tablespoon ground cumin
2 teaspoons ground oregano
3 cups chicken stock
1 ½ cups canned chopped tomatoes – with juice
1 red bell pepper, chopped
1 15 ounce can red beans (drain and rinse)
1 15 ounce can black beans (drain and rinse)
1/3 cup chopped cilantro
slices of lime (for serving)
In a large saucepan heat oil. Add onion and garlic and cook over medium heat until just tender (not brown). Add chicken and cook until no longer pink (turning as it cooks). That should be about 3 minutes. Stir in chili powder, cumin and oregano. Add stock, tomatoes and juice and chopped pepper. Season with salt and pepper. Cover, bring to boil and simmer over low heat for about 15 minutes.
Stir in beans, simmer uncovered over low heat for 15 minutes more, until chili is thickened.
Squeeze lime juice on top of the chili and garnish with a little chopped cilantro. Serve with warm corn bread and enjoy!
Wednesday, September 28, 2011
Pesto certainly isn't on the menu of traditional items for Rosh Hashanah.

But, I was just outside gathering cherry tomatoes for tonight's feast and I couldn't help but notice the basil...lots of it! Thai basil, lemon basil, cinnamon basil, boxwood basil and, of course, Italian basil.
Pesto is a great way to use up a lot of basil. It's so quick and easy to make (5 minutes, really) that I decided to grab some basil and make some. I can get it done while waiting for the pot of water for kneidel (matzo balls) to come to a boil. Pesto is wonderful to drizzle on salads, maybe heirloom tomatoes if you have any left, or tossed with boiled potatoes. It's incredibly versatile so think beyond a bowl of pasta. The best thing is that pesto freezes really well, So, even if I'm not serving it today or tomorrow or even next week, it can go into the freezer to enjoy at another time.
I have several recipes that I like to use for pesto. This is one of my favorites. It uses both pine nuts and walnuts so the flavor is a bit more complex than some recipes. While I'm not a cheese eater, I do love pesto. I usually take some of the basil, garlic and nut mixture out before adding the cheeses. I promise you, it's delicious either way!
 PESTO
PESTO
2 cups fresh basil leaves, washed and patted dry
4 large garlic cloves, peeled and finely chopped
1/2 cup shelled walnuts
1/2 cup pine nuts
1 cup extra virgin olive oil - use the best - it makes a difference!
1 cup freshly grated Parmesan cheese
1/4 cup freshly grated Romano cheese
salt and freshly ground black pepper
Combine the basil, garlic, walnuts and pine nuts in the bowl of a food processor. With the motor running, slowly pour in the olive oil in a slow, steady stream. (This will emulsify the mixture giving it body and richness.)
Shut the motor off. Add the cheeses, a liberal grinding of black pepper and a large pinch of salt. Turn the motor on just to combine the ingredients. Transfer to a bowl and cover until ready to use.
Makes about 2 cups

But, I was just outside gathering cherry tomatoes for tonight's feast and I couldn't help but notice the basil...lots of it! Thai basil, lemon basil, cinnamon basil, boxwood basil and, of course, Italian basil.
 |
| Boxwood Basil |
Pesto is a great way to use up a lot of basil. It's so quick and easy to make (5 minutes, really) that I decided to grab some basil and make some. I can get it done while waiting for the pot of water for kneidel (matzo balls) to come to a boil. Pesto is wonderful to drizzle on salads, maybe heirloom tomatoes if you have any left, or tossed with boiled potatoes. It's incredibly versatile so think beyond a bowl of pasta. The best thing is that pesto freezes really well, So, even if I'm not serving it today or tomorrow or even next week, it can go into the freezer to enjoy at another time.
I have several recipes that I like to use for pesto. This is one of my favorites. It uses both pine nuts and walnuts so the flavor is a bit more complex than some recipes. While I'm not a cheese eater, I do love pesto. I usually take some of the basil, garlic and nut mixture out before adding the cheeses. I promise you, it's delicious either way!

2 cups fresh basil leaves, washed and patted dry
4 large garlic cloves, peeled and finely chopped
1/2 cup shelled walnuts
1/2 cup pine nuts
1 cup extra virgin olive oil - use the best - it makes a difference!
1 cup freshly grated Parmesan cheese
1/4 cup freshly grated Romano cheese
salt and freshly ground black pepper
Combine the basil, garlic, walnuts and pine nuts in the bowl of a food processor. With the motor running, slowly pour in the olive oil in a slow, steady stream. (This will emulsify the mixture giving it body and richness.)
Shut the motor off. Add the cheeses, a liberal grinding of black pepper and a large pinch of salt. Turn the motor on just to combine the ingredients. Transfer to a bowl and cover until ready to use.
Makes about 2 cups
Wednesday, September 21, 2011
With more people growing tomatoes in their home gardens than any other vegetable I get lots of questions about tomato growing on any given day. Today, I received an email from someone questioning the black containers I use. This may be repetitive for some readers but it's an important question so I'm happy to answer again.
Here's the story...when growing tomatoes in containers the containers need to be large enough to hold lots of soil. Minimum of 15 gallons. Tomato roots are huge and they need the soil volume to feed, support and get moisture to them. The least expensive and easiest to find pots around here happen to be black plastic. So, I use them. Lots of them.
Now, it also gets quite hot here in the west San Fernando Valley. Couple that with the fact that my containers are sitting on a former basketball court and you'll get an idea of just how hot my containers and, therefore, my plants can get.
Here's what I do to help keep my plants from overheating:
The pots all go up on "pot feet". I think this helps with drainage and it also creates a small gap between the pot and the heat emanating off the concrete. Then, each pot is individually wrapped in burlap. I buy burlap bags at the local feed store and cut them open. They make it almost twice around the pots. Then I use garden staples to hold them in place. The pots remain wrapped for the entire season. When it's really hot I water the bags to help cool them down and hopefully cool the pots a little. The point here is this: black pots absorb heat and on really hot days the root balls will cook! Tomato leaves and fruit like some heat but the roots do not.

Last, I follow 3 different weather services daily. When the forecast gets anywhere near 90 I put up shade cloth. It drapes over frames made of pvc pipe and doesn't look pretty. But, we all have our priorities, and mine is to protect my tomato plants as much as possible.
Hope this helps! Keep your questions coming...
Laura
Here's the story...when growing tomatoes in containers the containers need to be large enough to hold lots of soil. Minimum of 15 gallons. Tomato roots are huge and they need the soil volume to feed, support and get moisture to them. The least expensive and easiest to find pots around here happen to be black plastic. So, I use them. Lots of them.
Now, it also gets quite hot here in the west San Fernando Valley. Couple that with the fact that my containers are sitting on a former basketball court and you'll get an idea of just how hot my containers and, therefore, my plants can get.
Here's what I do to help keep my plants from overheating:
The pots all go up on "pot feet". I think this helps with drainage and it also creates a small gap between the pot and the heat emanating off the concrete. Then, each pot is individually wrapped in burlap. I buy burlap bags at the local feed store and cut them open. They make it almost twice around the pots. Then I use garden staples to hold them in place. The pots remain wrapped for the entire season. When it's really hot I water the bags to help cool them down and hopefully cool the pots a little. The point here is this: black pots absorb heat and on really hot days the root balls will cook! Tomato leaves and fruit like some heat but the roots do not.
Hope this helps! Keep your questions coming...
Laura
Wednesday, July 20, 2011
Some days are better than others...It was really hot yesterday and the garden seemed to be wilting the moment the sun came up. I did manage to pick a handful of beans and a tomato or two before deciding it was just too hot to be outside. Shade cloth was up, watering had been done the day before, so I decided to spend the afternoon in front of the computer and doing paperwork. Don't ask me why I decided to do those things instead of, let's say, needlepoint or read a good book. Like I said, it wasn't one of my better days.

Early in the evening I decided it was time to head out to "tent city" to visit my plants. Maybe not one of my better decisions...apparently birds don't mind the heat. All the adorable new leaves on my cucumber plants were gone and I wasn't happy. Note to self - hang more CDs and bird tape tomorrow.

This year, for the first time ever, I've had a problem with rodents. Several large, nearly ripe tomatoes have been eaten lately so I can't say I'm surprised. Interesting that all of the snakes we've been finding lately haven't managed to keep them under control.

Walking past garden beds number 1 and number 2 I noticed a foul order. I'd know that smell anywhere - Eau de Dead Rodent. It was vile and, even worse, the smell was strongest very close to the lettuce bed where I was headed to get something for dinner. I did some searching but couldn't find the source of the smell so, armed with a long stick (to feel around for the rodent remains) I grabbed my lettuce and went back inside. Maybe if I ignore it, it will just go away...
Late last night, unable to keep my eyes open any longer, I dragged myself upstairs to go to sleep. It would be nice if I could just fall into bed and sink into my pillow but that's not my reality. I've got to coax Daltry and Townsend, my two cats out of my spot. As if that's not enough, I then have to wait for Townsend to lay back down in his favorite position - his rear end in the pit of my arm with his tail swishing across my nose. I grab his tail and pin it down under my arm. Foolishly, I rest my other hand on top of the sheets. Daltry feels that any skin is for him to lick with his scratchy tongue so after repeatedly trying to gently shove him away, I bury my other hand under the covers. Ok, please, can I just go to sleep now?
The phone rings. Four times. The portable phone which belongs right next to the bed is no where to be found. I assume that if someone is calling that late at night it must be really important. Ok, Jewish mother that I am, I assume something is wrong. So, I get up and hunt for the phone. As I carry it back to the bedroom it rings again. "Hello??" Someone is laughing, cracking up really on the other end of the phone. It's my son, calling from his cell. Did I mention that he was sitting outside my house on the patio and he's calling me at midnight from his cell phone? "What's so funny?" I ask, trying not to sound perturbed. He was sitting on his chair when he notice a very long tail pass by. There aren't too many lizards out at midnight and mice aren't that big. At this point, all I can think of is The Princess Bride and the ROUSSes - Rodents of Unusual Size.
Through his laughter, Andrew confirms that it's a rat, but that the rat seems to like sitting right there with him. Rather than scurrying off to eat something tasty from the garden it turned around and came back to take in the evening on my patio. With my son, who was now standing on the chair, laughing and calling to share the whole encounter with me.
Oy Vey.
I grab my book and try to read a couple of pages before nodding off but I'm really distracted by a really sour smell. Getting out of bed, I'm crawling around the floor looking for signs of kitty accidents. As I get close to the open window I realize exactly what it is...Skunk! It seems to be right outside my window.
Did I mention how hot it was yesterday? It wasn't exactly a cool evening, either. I had to close the windows, making it less than pleasant upstairs. As much as I hated to do it, I cranked up the air conditioner, pointed portable fans at my face to give me fresh air to breathe and went through the process with Daltry and Townsend one more time, this time settling in to sleep.
Ah yes, just another day in paradise!

Early in the evening I decided it was time to head out to "tent city" to visit my plants. Maybe not one of my better decisions...apparently birds don't mind the heat. All the adorable new leaves on my cucumber plants were gone and I wasn't happy. Note to self - hang more CDs and bird tape tomorrow.

This year, for the first time ever, I've had a problem with rodents. Several large, nearly ripe tomatoes have been eaten lately so I can't say I'm surprised. Interesting that all of the snakes we've been finding lately haven't managed to keep them under control.

Walking past garden beds number 1 and number 2 I noticed a foul order. I'd know that smell anywhere - Eau de Dead Rodent. It was vile and, even worse, the smell was strongest very close to the lettuce bed where I was headed to get something for dinner. I did some searching but couldn't find the source of the smell so, armed with a long stick (to feel around for the rodent remains) I grabbed my lettuce and went back inside. Maybe if I ignore it, it will just go away...
 |
| Daltrey |
 |
| Townsend |
The phone rings. Four times. The portable phone which belongs right next to the bed is no where to be found. I assume that if someone is calling that late at night it must be really important. Ok, Jewish mother that I am, I assume something is wrong. So, I get up and hunt for the phone. As I carry it back to the bedroom it rings again. "Hello??" Someone is laughing, cracking up really on the other end of the phone. It's my son, calling from his cell. Did I mention that he was sitting outside my house on the patio and he's calling me at midnight from his cell phone? "What's so funny?" I ask, trying not to sound perturbed. He was sitting on his chair when he notice a very long tail pass by. There aren't too many lizards out at midnight and mice aren't that big. At this point, all I can think of is The Princess Bride and the ROUSSes - Rodents of Unusual Size.
Through his laughter, Andrew confirms that it's a rat, but that the rat seems to like sitting right there with him. Rather than scurrying off to eat something tasty from the garden it turned around and came back to take in the evening on my patio. With my son, who was now standing on the chair, laughing and calling to share the whole encounter with me.
Oy Vey.
I grab my book and try to read a couple of pages before nodding off but I'm really distracted by a really sour smell. Getting out of bed, I'm crawling around the floor looking for signs of kitty accidents. As I get close to the open window I realize exactly what it is...Skunk! It seems to be right outside my window.
Did I mention how hot it was yesterday? It wasn't exactly a cool evening, either. I had to close the windows, making it less than pleasant upstairs. As much as I hated to do it, I cranked up the air conditioner, pointed portable fans at my face to give me fresh air to breathe and went through the process with Daltry and Townsend one more time, this time settling in to sleep.
Ah yes, just another day in paradise!
Sunday, July 3, 2011
Last weekend I drove up north to attend four seminars offered at the Monterey Bay Master Gardeners Boot Camp. It was an incredible day from start to finish. My first class was all about Integrated Pest Management. All the classes were interesting and packed with information but I think this one may have been my favorite. It's fascinating to consider the food chain when thinking about garden pests, from the tiniest green worm to the owl outside my bedroom window. There is so much to know and there was no way this class could do any more than scratch the surface. There's just so much we can do to deal with garden pests before we pull out the bottle of spray. I guarantee you this is a topic I will revisit.
My next class was all about Soil. There's nothing more important to a successful garden than the quality and health of the soil that we plant in. While I knew that going in, I still learned more. I left that class with a concise list of six steps to healthy soil along with a wealth of resources and links to refer to.
Next, I took something a little different - Chicks in the City! I am strongly considering raising chickens - we use so many eggs here, it's really ridiculous not to! I just have to work on the logistics before making the commitment. There's a lot to consider for chickens - I always loved doll houses so I have to remind myself there's more than just an adorable chicken coop! I'll keep you posted about what I decide.
My last class was also about Soil, but this time it was specific to soil inoculants and keeping the soil healthy when something goes amiss.
The most impressive thing about the day was the attendance - well over 100 people showed up to spend the entire day, from 9 until 4 in classes about gardening. While the reasons for attending and the motivation for gardening were as unique as the people attending, these people were all committed to being responsible for what goes into their food and making it a priority to grow their own.
I had to wonder - where are the people like this in Los Angeles? The San Fernando Valley has the perfect climate for growing vegetables and fruit and it's full of families with young children to keep healthy. I know a lot of people who use words like non-GMO and organic, but where is the community of people taking action and doing more than using a few buzz words?
I left the event energized and excited to get back to my garden. It was a long drive back home and I had plenty of time to consider what I want to do with all that I had learned that day and how I want to share it with all of you. I love growing and I love teaching. Here, at my homestead is where it all comes together.This is where that community can take shape. The classes that I offer in gardening and cooking are designed to inspire and encourage people like you to take the steps to a more authentic, healthy and fulfilled life. For me, growing vegetables, cooking and sharing meals are ways of bringing people together and keeping them connected. Your motivation for growing your own food may be different than mine. No matter the reasons or where home is, no matter how much space you have, let's bring the bliss back home.
Tuesday, June 21, 2011

Remember in Tomato Growing Class we talked about staking your plants? Consider this to be your not so subtle reminder...staking is something that needs to be done throughout the growing season! Here's another reminder - those indeterminate varieties that you put in at the end of March will probably get six to eight feet tall by the end of the season! Flowers form all along the branches, so when they grow into heavy tomatoes those branches get really heavy. Something has got to support those puppies so they don't bend and break!

I use 3/8" plastic gardening tape, or when I have it, gardener's velcro to loosely tie the main trunk of the tomato plant to the stake at the center. That stake went in the same day that I put the starts in the ground. Don't add stakes now as they can damage the tomato's roots. I also cage the tomatoes when I plant so the support is there for the lanky branches when the time comes. Gently tie the branches to the cage to keep them supported.
You want to support the main trunk and the flowering branches at 1 1/2 foot intervals. Loosely tie the supports just under the branch that is fruiting.

In the event that you miss a branch and it does fall and break - don't panic. Happened to me just last week...the branch had lots of flowers on it so I didn't want to remove it. Instead, I reminded myself that tomatoes grow like weeds and they must be able to withstand a little break in the stem. Then, I got out the duct tape, repaired the break and the branch and flowers are as happy as can be!

Wednesday, May 18, 2011
All Choked Up!!

Artichokes are grown for their tender, edible flower buds. They have large, silvery-green leaves and thick stems. They're really quite impressive. I always love driving through the vast fields of artichokes in Castroville. It seems like an endless sea of artichokes, all standing up straight and tall like soldiers in a row. While most people might grow artichokes for the tasty treats sitting on top of the stems I’ve also seen several gardens where they are grown ornamentally. The bright purple flowers are stunning and make an interesting addition to the perennial garden.
Artichoke plants are incredibly easy to grow. They thrive best where winters are mild and summers are warm. They do like a bit of summer fogginess, but to be honest, they do quite well here in the heat of the San Fernando Valley. They can produce harvests for up to 5 years. I cut my plants back each winter and they are full and lush by Spring. In colder climates, you have to treat them as annuals and re-plant in the Spring.
Buy artichoke plants at the local nursery after the last danger of any frost. Artichokes grow best in rich, well-drained soil. Choose a site that gets full sun. Plants grow to be 4- to 5 feet tall so be sure they are sited where their shade won’t be harmful to any other plants.
When you plant artichokes, dig the soil deeply, and add plenty of organic matter. I always put two large handfuls of fertilizer in the hole when I plant. I also add two tablespoons of John and Bob’s Soil Optimizer. This helps get the nutrients in the fertilizer to the plant faster, aids in water retention and helps feed the beneficial bacteria in the soil. I don’t plant anything without my John and Bob’s. After artichokes are established and new growth appears, fertilize plants once a month. Keep soil moist throughout the growing season. Artichokes are heavy feeders and you can also apply a high-potassium fertilizer every 2 weeks during periods of active growth to encourage flower buds to form.
Harvest artichokes before the buds start to open and they're still green and tight. The central bud usually ripens first. The side buds are usually smaller and ripen later.
We're in the middle of artichoke season and I’m harvesting every day. One of the easiest and most delicious ways to enjoy them is with a simple lemon and olive oil emulsion. Let me know how you like it…
Grilled Artichokes with Lemon and Olive Oil
1 lemon, cut in half
2/3 cup extra virgin olive oil
1/3 cup fresh squeezed lemon juice
Several small artichokes (this recipe will make enough for about 12 small or 6 large artichokes)
Squeeze juice from lemon halves into bowl of cold water. Cut stems off artichokes, leaving about 1 inch. Snap off bottom 3 rows of leaves. Cut off tips of artichokes and trim tops of remaining leaves. Halve artichokes lengthwise. Scrape out chokes. Place in lemon water.
Bring large pot of salted water to boil. Add artichokes and boil until crisp-tender, about 6 minutes. Drain; pat dry. If preferred, you can steam the artichokes until just tender.
Prepare barbecue (medium heat). Slowly add oil to1/3 cup lemon juice, combining with a whisk in small bowl. Brush artichokes with some of dressing. Grill until tender and charred in spots, about 5 minutes per side. Transfer to serving bowl or platter. Season remaining olive oil/lemon mixture with salt and pepper as desired. Pour dressing into small bowl and serve alongside grilled artichokes.
Tuesday, April 26, 2011

This is the time of year that we're planting our tomato seedlings outside. In just a couple of months those tomato plants will tower over most of us and some will reach 7 to 10 feet in height! Add to that, the plants will hopefully be heavy with ripening fruit and you'll understand why tomato plants definitely need support - lots of it!
I support my tomatoes both at the center trunk and with some type of tomato cage to help hold the branches and fruit. My rule is that as soon as I plant, I put a tall stake in the soil about 3 inches away from the center of the plant. Don't wait to put the stakes in later. They could disturb and harm the large root system that is developing.
While they can sometimes be difficult to find, I like to use the metal spirals as stakes. If I'm careful and very attentive I can somewhat train the plants to go up the spiral and reduce the amount of tying I have to do. I also often use the plastic coated metal stakes that are easily found at every nursery and garden center. You'll notice I haven't said anything about redwood stakes...that's because I never use them! They rot and break, especially under the pressure of a heavy tomato plant.
There are a variety of wire cages available that are used to support tomatoes. You'll see just some of them in the photo above. Remember the old school tomato cages we used to buy?

Well, in truth they are not very effective when used with tomatoes. They were designed for the cut flower market and while they can be terrific at corralling Chrysanthemums they will surely be crushed by the weight of a full grown tomato plant.
Well, in truth they are not very effective when used with tomatoes. They were designed for the cut flower market and while they can be terrific at corralling Chrysanthemums they will surely be crushed by the weight of a full grown tomato plant.

These green steel cages are quite sturdy and they blend in with the plants so they don't become an eyesore. They are reasonably priced and easy to manage. My preference is something taller as my plants definitely grow taller than these cages.

I grow several tomatoes in 15-gallon containers and many cages will not fit inside of them. For those, I make cages using hardware cloth. It's simple enough to make them although the rolls of wire (hardware cloth) are heavy and difficult to handle on your own. I don't recommend this type of cage for plants growing in the ground as they are not stable, especially in times of extreme wind.

My favorite cages are Texas Tomato Cages. They come in two pieces so they're easy to manage. There are two-foot extensions that can be placed on top for additional height. While a six-foot cage is usually tall enough there are always one or two plants that outgrow them. The Texas Cages have long spikes at the bottom so they remain firm once placed in the ground. Best of all, these cages fold flat for storage when they're not in use...they definitely can be used for peas and other climbing crops.

I must warn you...Texas Tomato Cages are not inexpensive but they are worth every penny. They will last forever and will be the only tomato cages you'll ever need.
I grow several tomatoes in 15-gallon containers and many cages will not fit inside of them. For those, I make cages using hardware cloth. It's simple enough to make them although the rolls of wire (hardware cloth) are heavy and difficult to handle on your own. I don't recommend this type of cage for plants growing in the ground as they are not stable, especially in times of extreme wind.
My favorite cages are Texas Tomato Cages. They come in two pieces so they're easy to manage. There are two-foot extensions that can be placed on top for additional height. While a six-foot cage is usually tall enough there are always one or two plants that outgrow them. The Texas Cages have long spikes at the bottom so they remain firm once placed in the ground. Best of all, these cages fold flat for storage when they're not in use...they definitely can be used for peas and other climbing crops.
I must warn you...Texas Tomato Cages are not inexpensive but they are worth every penny. They will last forever and will be the only tomato cages you'll ever need.
Monday, April 25, 2011
Confetti Cabbage Salad

Having an abundance of red cabbage in the garden reminded me of a recipe that I got a long time ago. A dear friend from college shared it with me. It's become a family favorite that we enjoy on many occasions.

Confetti Cabbage Salad
¼ cup sliced almonds
¼ cup sesame seeds
2 tablespoons Vegetable Oil
8 green onions (finely chopped)
1 head red cabbage (chopped)
Carefully brown almonds and sesame seeds in 2 tablespoons oil. Watch them closely as nuts and seeds tend to burn quickly. Drain on a paper towel and allow to cool.
Make Dressing:
¼ cup granulated sugar
1 tsp black pepper
1 tsp salt
1 cup vegetable oil
6 tablespoons seasoned rice vinegar
Using a whisk combine ingredients to make dressing.
Saturday, April 23, 2011
Oh So Good Brisket!!
While running errands this morning I bumped into a woman who I've met once or twice. She re-introduced herself to me (we're Facebook friends) and we began chatting. She was sweet and lovely and we hit it off almost immediately. I was glad she took the time and made the effort to come say hello. Toward the end of the conversation she asked "So, can I ask for a recipe or do I have to attend a class first?" With some trepidation I replied "Sure, what recipe do you need?" I was a little nervous that she would ask for something a bit obscure but was immediately put at ease when she said that she just made her first Passover dinner and was wondering how I do my brisket. Sounds like hers perhaps wasn't stellar, but there's always next year...
I've made brisket so many times I could do it while in a coma. As it happens, I was on my way home to put a brisket in the oven for our Passover Seder tomorrow. I know, tomorrow is Easter, but it's also the only day all of my kids could be here. So tomorrow morning we're having an Easter Egg Hunt and tomorrow evening a Passover celebration (again). I always say I love to celebrate and tomorrow I'll be doing plenty of it!
Getting back to the brisket...I decided to show you step by step the easiest way to make an incredibly delicious brisket that everyone will love. Here goes:
 First, assemble the seasonings...Salt, Black Pepper, Lawry's Seasoned Salt, Garlic Powder, Worcestershire Sauce, Bay Leaves and Paprika (not shown).
 Here's my brisket. See all that fat on the top layer?? You want that. Yep, all of it. It will add great flavor and keep the meat moist. You can cut it off later or trust that the people you're serving will have the good sense to do that for themselves.

Now, cut up one large onion into about 8 wedges. No need to count. This isn't rocket science.

Strew the onion wedges into the bottom of your roasting pan. Separate the wedges so the pieces lightly cover the bottom of the pan.

Lay the brisket on top of the onion - fat side down. generously season the meat in this order: Salt, Pepper, Lawry's Seasoned Salt, Garlic Powder and...

Worcestershire Sauce - drip some onto the brisket and use a brush to schmear it all over the meat.
Follow with more Lawry's Seasoned Salt and Paprika.

Now, turn the meat over leaving the onions in the bottom of the pan. Season the fat layer of the brisket the exact same way you did the other side. Cut another onion into quarters. Put a Bay Leaf on top of the brisket at the center. Put a little piece of onion to hold it down and place the onion quarters on each corner of the brisket.
 Pour water into the pan around the brisket until it is a good half way up the sides of the meat.

Cover the roasting pan using either the lid it comes with or a tightly fitted layer of heavy duty aluminum foil.
Put the pan into the oven which has been preheated to 325 degrees. Leave it in there. Don't look, don't check it. Really, just ignore it. For four hours. Exactly four hours. At the end of four hours carefully remove the pan from the oven. There will be lots of really hot liquid in the pan. Carefully remove the lid or foil starting with the corner away from you as very hot steam will poof out. Take a long-tined fork and insert it into the middle of the brisket. It should insert and come out very easily. That's how you know the brisket is done.
So, run to the market and pick up a brisket so you can get it into the oven. It's better when you make it the night before you want to serve it or you can freeze it for later use. I'll add pictures of mine when it comes out of the oven. Two hours to go...Plenty of time to get tomorrow's chicken started, too.
I've made brisket so many times I could do it while in a coma. As it happens, I was on my way home to put a brisket in the oven for our Passover Seder tomorrow. I know, tomorrow is Easter, but it's also the only day all of my kids could be here. So tomorrow morning we're having an Easter Egg Hunt and tomorrow evening a Passover celebration (again). I always say I love to celebrate and tomorrow I'll be doing plenty of it!
Getting back to the brisket...I decided to show you step by step the easiest way to make an incredibly delicious brisket that everyone will love. Here goes:


Now, cut up one large onion into about 8 wedges. No need to count. This isn't rocket science.

Strew the onion wedges into the bottom of your roasting pan. Separate the wedges so the pieces lightly cover the bottom of the pan.

Lay the brisket on top of the onion - fat side down. generously season the meat in this order: Salt, Pepper, Lawry's Seasoned Salt, Garlic Powder and...

Worcestershire Sauce - drip some onto the brisket and use a brush to schmear it all over the meat.
Follow with more Lawry's Seasoned Salt and Paprika.

Now, turn the meat over leaving the onions in the bottom of the pan. Season the fat layer of the brisket the exact same way you did the other side. Cut another onion into quarters. Put a Bay Leaf on top of the brisket at the center. Put a little piece of onion to hold it down and place the onion quarters on each corner of the brisket.


Cover the roasting pan using either the lid it comes with or a tightly fitted layer of heavy duty aluminum foil.
Put the pan into the oven which has been preheated to 325 degrees. Leave it in there. Don't look, don't check it. Really, just ignore it. For four hours. Exactly four hours. At the end of four hours carefully remove the pan from the oven. There will be lots of really hot liquid in the pan. Carefully remove the lid or foil starting with the corner away from you as very hot steam will poof out. Take a long-tined fork and insert it into the middle of the brisket. It should insert and come out very easily. That's how you know the brisket is done.
So, run to the market and pick up a brisket so you can get it into the oven. It's better when you make it the night before you want to serve it or you can freeze it for later use. I'll add pictures of mine when it comes out of the oven. Two hours to go...Plenty of time to get tomorrow's chicken started, too.
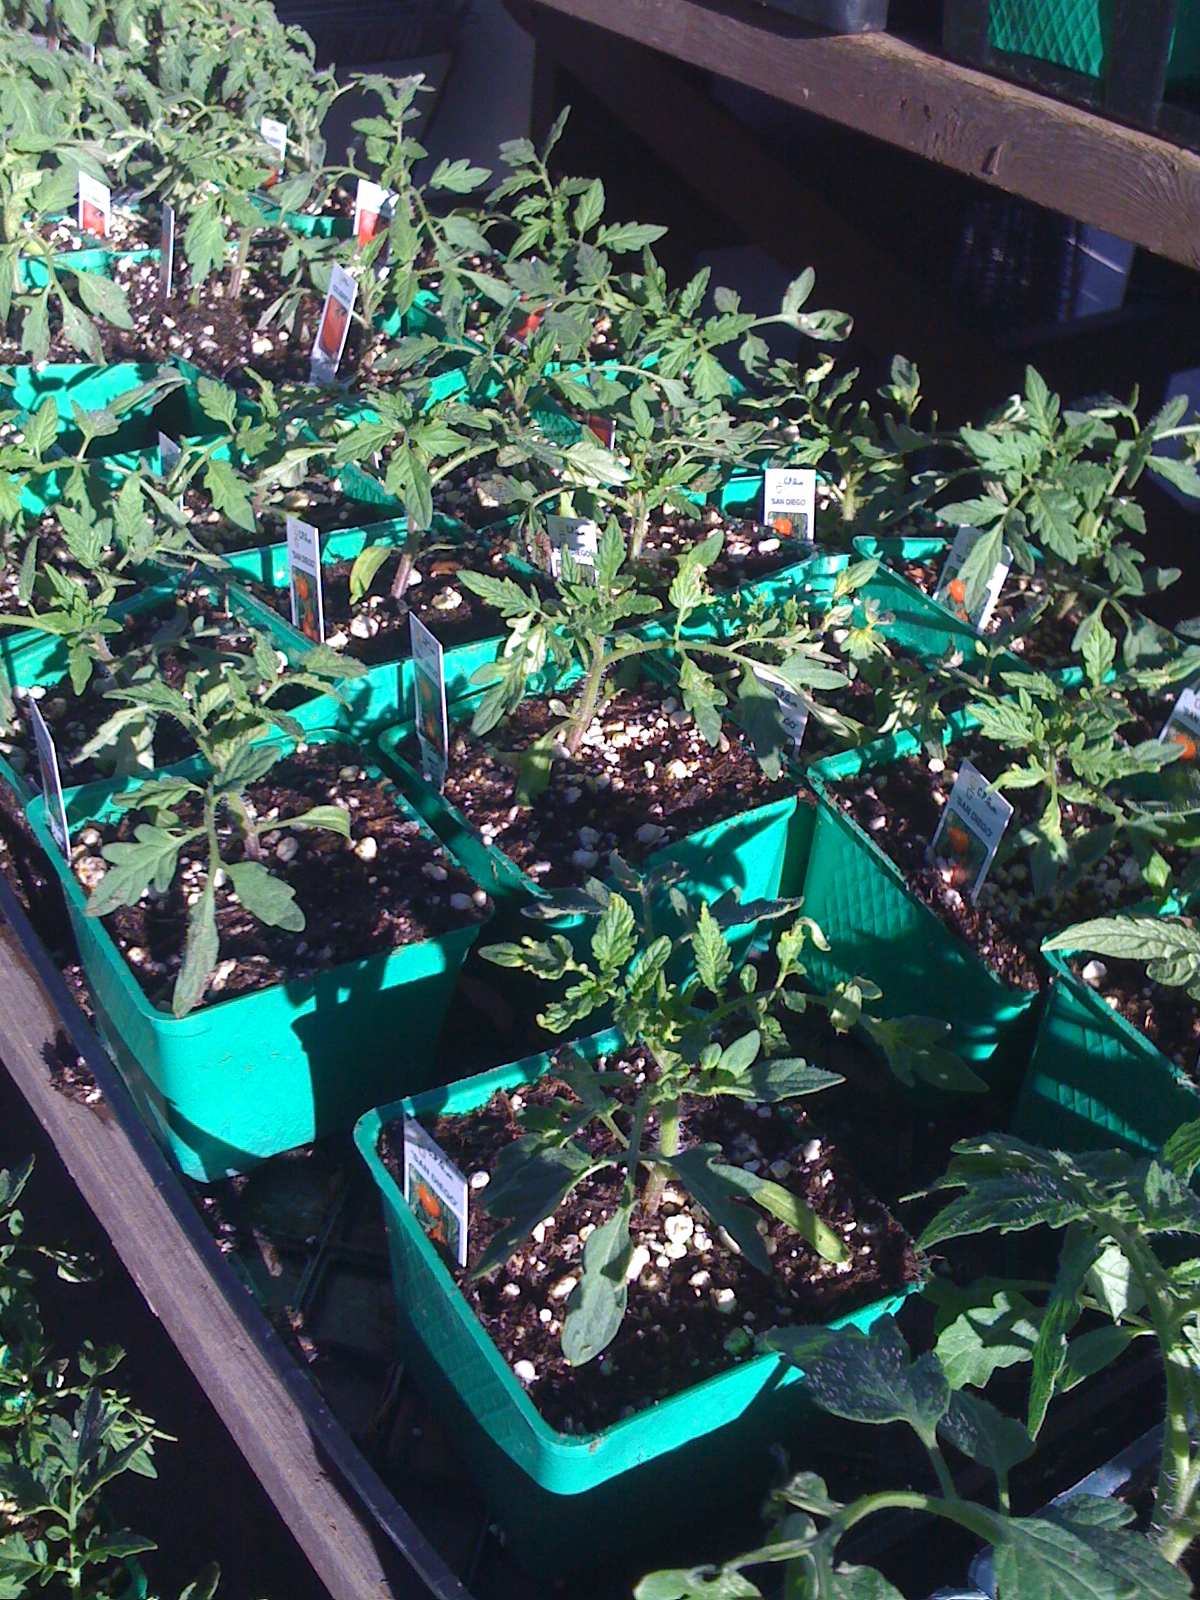
Tuesday, April 5, 2011
Where do all the tomato plants go??

Every Spring my collection of tomato plants seems to exceed the amount of space I have in the ground. I cannot go to a nursery or seedling sale without coming home with a new variety that sounds so wonderful I just have to try it, or a duplicate of one of my favorites. Can you ever have too many Pineapple tomatoes? As I run out of space in my raised beds I turn to containers for additional tomato plants. For years I have used 15 gallon plastic containers that I buy at the big box store or sometimes at the local nursery.
The containers, as you can see in the photo are black. And, you may also notice that they're sitting on a basketball court, which in Woodland Hills summers, translates to really hot! The containers are always elevated on pot feet, both to facilitate drainage and to keep them from direct contact with the hot cement. I've often put a layer of artificial turf underneath them. And this year, I think I might paint them white to help them reflect the heat rather than absorb it.
You may be wondering why I use such large containers. The answer to that is quite simple ...soil! I need enough growing medium in the container to support the huge root system that the tomato seedling will quickly develop. A smaller amount of soil will drain too quickly, taking all of the wonderful nutrients that I carefully provide my plants along with it. The result will be more frequent watering (leaching the soil of even more nutrients) and over watering is exactly what leads to unhealthy plants producing tasteless tomatoes!
When choosing containers, the most important things to look for are size and proper holes for drainage. Ideally, you want a container with 3 drainage holes at the bottom of the side wall of the container. You'll see pots made of all sorts of materials - terra cotta, plastic, half wine barrels and paper pulp. I've always used plastic containers but have to admit that the pulp pot did quite nicely last year and even held up well enough to be used again this season.
Don't let a lack of ground space keep you from growing your own tomatoes. Containers just may be the answer for you.
Monday, March 14, 2011
Oh What a Happy Day!
I like to use March 15 as a target date for planting tomatoes. It's more important, though, to watch the local weather forecast...tomatoes won't do well in cooler than 50 degree temperatures. So, before heading to the veggie patch with your gloves and trowel make sure that the nighttime low is expected to remain above 50 degrees before planting.
In case this post whets your appetite and leaves you hungering for more on how to and when to plant tomatoes, register for my next "Yes, You Can Grow Tomatoes" class on Saturday, April 16 at 10 am.
Sunday, February 13, 2011
Tomato-Orange Marmalade

Yesterday I filled a bag with sweet, juicy oranges. I made a citrus marinade for a pork tenderloin that will be tonight's dinner. And, I put up a batch of Tomato-Orange Marmalade. The marmalade is delicious on toast or a cracker or even a chunk of cheese. My friends have layered it on sandwiches and I'm thinking it would be a tasty accompaniment to tonight's tenderloin.
Be forewarned, it takes a long time to make this marmalade. If you choose to invest the time it will be worth it! Use your imagination...there are so many possibilities. Can't wait to hear your results and how you choose to enjoy it!
Tomato Orange Marmalade
This recipe makes only a small amount so it’s not necessary to sterilize or process the jars. Marmalade keeps in the refrigerator for 3 week.
Delicious as an accompaniment to beef, poultry, fish, pork and even warm toast
3 pounds ripe tomatoes, peeled and chopped, reserving juices
3 cups sugar
2 juice oranges, quartered, seeds removed, and sliced crosswise 1/8 inch thick
1 lemon, quartered, seeds removed, and sliced crosswise 1/8 inch thick
1/8 teaspoon salt
Place two small plates in the refrigerator to chill. They will be used for testing marmalade.
Place all ingredients, including reserved juices from tomatoes, in a pot. Cook over medium heat, stirring frequently, until sugar is dissolved, about 6 minutes. Simmer, stirring often to prevent scorching. Continue to cook, adjusting heat as necessary, and check for doneness after 1 ½ hours. Drop a spoonful of marmalade onto a chilled plate, the marmalade should remain in a mound and not run when the plate is tilted.
When marmalade has thickened and is done, remove from heat and cool, uncovered. Chill in glass airtight container.
Wednesday, February 9, 2011
I Love Super Bowl Sunday!
I love Super Bowl Sunday. Not because of all the sinful, high-fat, delicious snacks and beer that are a Super Bowl tradition. It’s not because we finally get to see all of the amazing commercials that we’re promised. It’s not because of the incredibly talented musicians that perform at the pre-game and half time shows. And it certainly isn’t for the football…
It’s for the peace and quiet that comes with it. Since the game started I’ve have received very few emails other than advertisements. The phone hasn’t rung. One by one, everyone in the family said goodbye and went off to a Super Bowl party at someone else’s house. The neighbors are all inside in front of their televisions. My world is practically silent and the only sounds I hear are bees and birds and squirrels enjoying the warm afternoon.
My garden is in a state of in-between. It’s been very warm in Los Angeles lately. Today the temperature climbed to almost 80 degrees. The lettuces growing in the garden have bolted. Arugula stands four feet high and the flavor is much too sharp. However, evenings still get quite chilly. Temperatures dip too low for summer vegetables.
I know myself well enough to know that I must have something growing and producing in my garden at all times. It’s a physical need. I also know that it’s better to keep the garden soil active so it will be healthier when it is time to plant my summer crops. So, on this quiet afternoon, while all of the cheering went on inside, in front of the television, I embraced the silence and got to work. Out went the giant arugula and spinach. Sugar snaps peas have succumbed to the heat so they went, too. I turned the soil, gave it a healthy dose of amendment and began again. I planted row after row of lettuce, spinach, peas and more, leaving plenty of room in between for tomato plants that will go in the ground in another month or two. I hung a layer of shade cloth over the seedlings, hoping it will be enough to protect them from the heat. Now, it’s a game of wait and see. The weather has been fickle and who knows what it will bring? At least I know that, once again, the garden is alive and growing, and so am I.
Subscribe to:
Posts (Atom)